How to set up Google Analytics on your WordPress website
Google Analytics helps you understand your audience. It shows you how people find you, which content is most popular, where your visitors are located, and much more. In this tutorial, you’ll learn how to block hits from spam referrals, exclude your IP address, track downloads, and enable demographic reports. This is how I set up Google Analytics on every website I build.
If you already have Google Analytics on your website, I bet you’ll learn something new. If you don’t have it on your website, you’re missing out! Grab a coffee and follow the steps in this tutorial to get set up.
Part 1: Five steps to set up your Google Analytics account
1) Create your Google Analytics account
- Sign up for Google Analytics with your Google account.
- Set a name for your account, input your website’s URL, and set the correct time zone for your location.
- Agree to Google’s terms and conditions.
After you agree to Google’s terms and conditions, you’ll be greeted by the Tracking Code section of your Analytics account. It’ll tell you to add a bit of code to every page you want to track. Who has time to add code to every page of their website!? Not me. In part two of this tutorial, I’ll show you how the Google Analytics by MonsterInsights plugin will add the code for you.
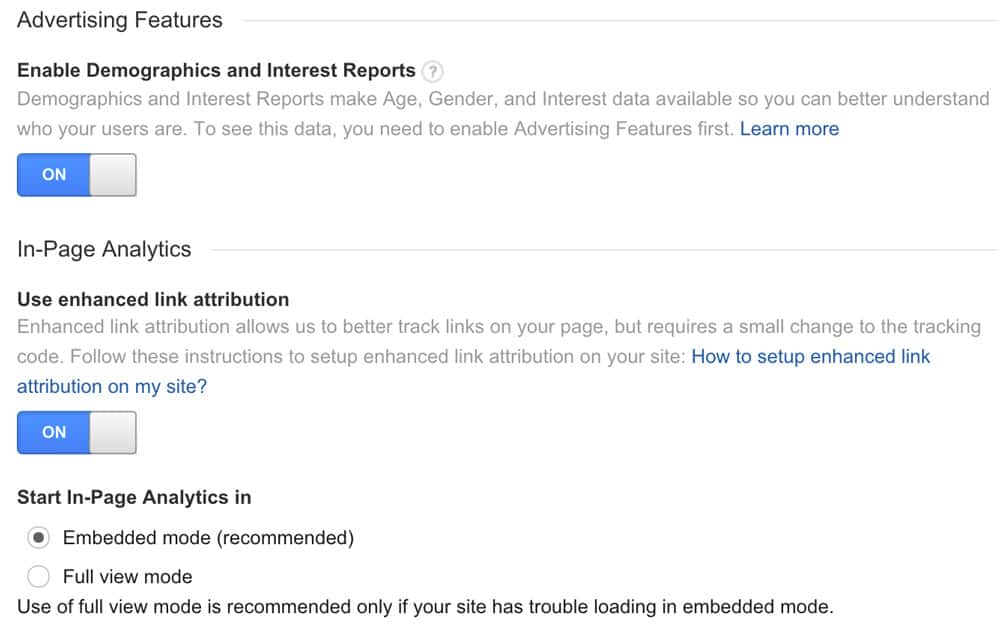
2) Turn on enhanced reports and link attribution
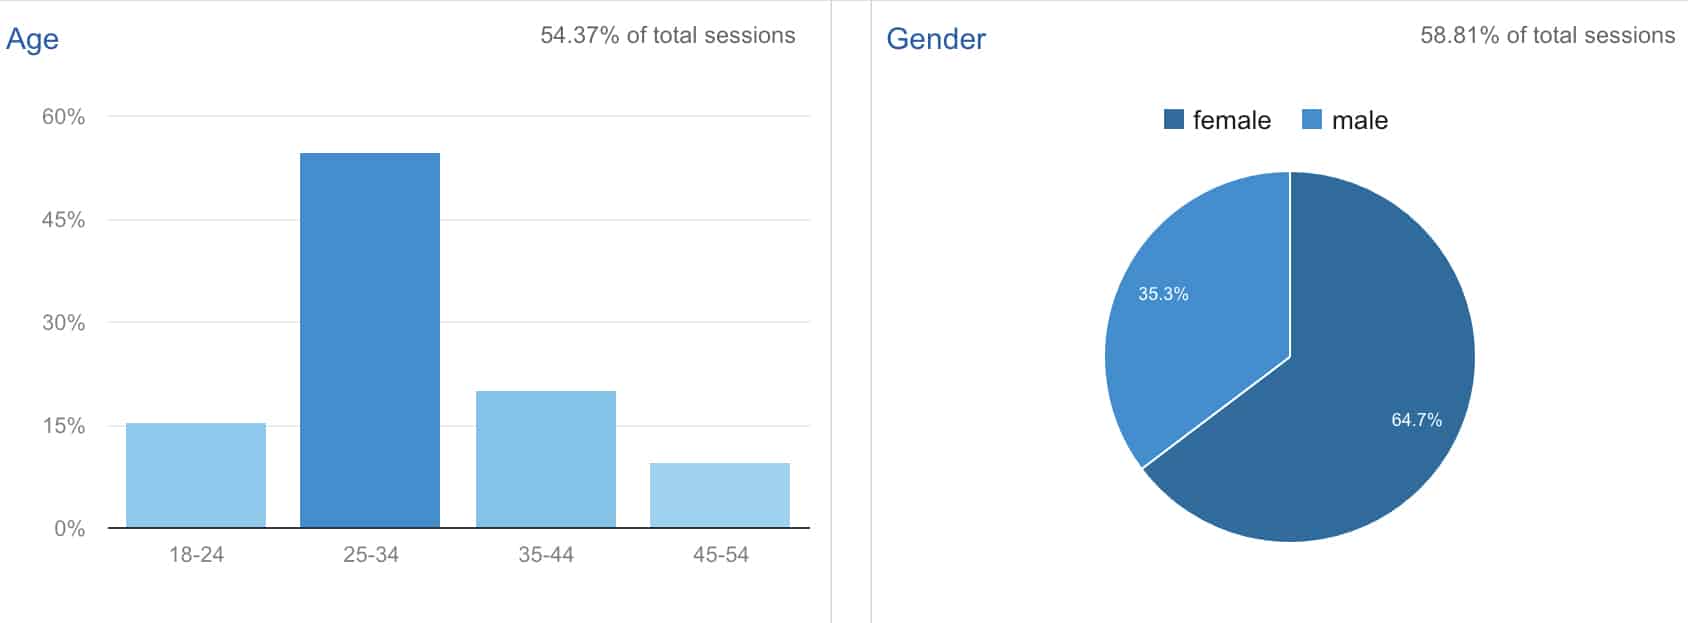
Google Analytics has a few features that you have to turn on. They provide extra data about your website’s visitors. Turning on the demographics and interests reports gives you data on your visitors’ age, interests, and gender.
- Go to the Property Settings panel (two levels above the Tracking Code panel in the screenshot above)
- Scroll down to the advertising features section. Turn on Enable Demographics and Interest Reports and the Use enhanced link attribution options.
- Hit the save button to save your changes
3) Enable advertising features
You need to enable advertising features to get information on the age, gender, and interests of your visitors. I know it seems like we just enabled this in the last step, but there’s one more button to click to set it up.
In the menu at the top of your Analytics dashboard, click Reporting. This takes you into your Analytics dashboard. Scroll down and find the Demographics tab on the left-hand menu. Go into the Demographics overview section and click the Enable button. Now the demographic reports are all set up!

4) Exclude your IP address from your analytics
I visit my website more than anyone else does. I don’t want my own visits included in my analytics data! You can exclude your own visits by setting up a filter in Google Analytics. You need to know your IP address to set up the filter. Find your IP address by googling “what is my IP address.”
Already have Google Analytics on your website? If you exclude your IP address now, you may notice a big change in your numbers. Sorry to burst your bubble!
Setting up a filter to exclude your IP address
Once you know your IP address, go to the “Filters” section in the Analytics admin panel. Follow the steps or watch the gif below to exclude your IP address from your analytics.
- Filter Name: I usually call mine “excluded IP – melissa.”
- Filter Type: predefined
- Select Filter Type: Exclude
- Select source or destination: traffic from the IP address
- Select expression: that are equal to
- IP Address: paste your IP address in here

5) Block hits from bots and spiders
Bots come to your website, stay for a millisecond, then leave. Once you’ve had Analytics set up for a while, these bots become extremely annoying. You’ll be trying to understand your data, but random visitors from Russia are skewing your statistics. Can you tell I’ve been there? I’m happy to tell you there are a few ways to get these annoying bots out of your statistics.
A) Tick off “block bots and spiders” in Google Analytics
Go to the View Settings section of the Google Analytics admin panel. At the very bottom of the View Settings, there’s a checkbox to exclude hits from known bots and spiders. Tick it off! Now Google will automatically exclude any known bots from your statistics.
B) Install the GM Block Bots plugin
I love the GM Block Bots plugin. Before I installed it on my website, spam websites were taking over my statistics. Every analytics report was filled with referrals from spam websites like semalt.com and buttons-for-website.com.
This plugin blocks these annoying websites from appearing in your statistics. It’s not retroactive. Unfortunately, if you already have spam in your analytics data it won’t be able to fix that. It starts working as soon as you activate it. To install it, go to the Plugins panel in your website and search for “GM Block Bots.” Click Install Now and activate the plugin. You don’t have to fiddle with any settings for this plugin. It works silently in the background of your website.
The developers update the plugin fairly often. Keep it updated to ensure you’re blocking as many bots as possible.
Woohoo! Your Google Analytics account is all set up. Next, you need to connect your analytics account to your website.
Part 2: Five steps to connect Google Analytics to WordPress
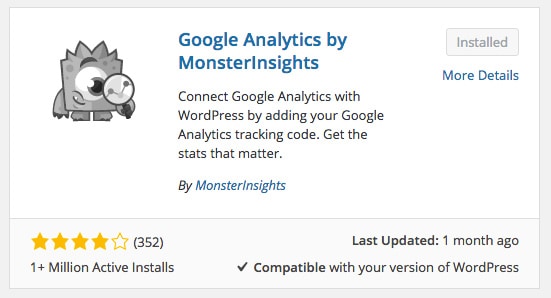
1) Install the Google Analytics by MonsterInsights plugin
Update: June 5, 2016 – this blog post originally referred to the recommended plugin as Google Analytics by Yoast. The plugin was created by Yoast and on April 14, 2016 it was transferred to MonsterInsights. The new name is Google Analytics by MonsterInsights. All links in this blog post are updated accordingly. It’s the same great plugin with a new owner. 🙂
The Google Analytics by MonsterInsights plugin connects your website to your Google Analytics account. To install it, go to the Plugins panel in your WordPress dashboard. Click the Add New button and search for “Google Analytics By MonsterInsights”. When you find it, select Install Now to add the plugin to your website. Activate it and you’ll see a new Analytics panel in your main menu.
Google Analytics and WordPress: themes vs. plugins?
Some WordPress themes include a spot to enter your Google Analytics details. I recommend using a plugin, rather than your theme, for setting up your Google Analytics.
- Google Analytics by MonsterInsights includes powerful options for configuring your Analytics. These options won’t be included in your theme.
- You may redesign your website and change your theme. If your analytics code is in your theme, changing your theme will remove your analytics code from your website.
- It’s best to use a plugin for any long-term functionality you want to add your website. This way, you’re free to change your theme anytime you like and you won’t lose any functionality on your website.
Is your analytics code currently in your theme settings? Follow the steps in this tutorial to get the Google Analytics by MonsterInsights plugin set up. Then, remove the analytics code from your theme settings. You don’t want the code on your website twice!
2) Link your Google Analytics account to the Google Analytics by MonsterInsights plugin
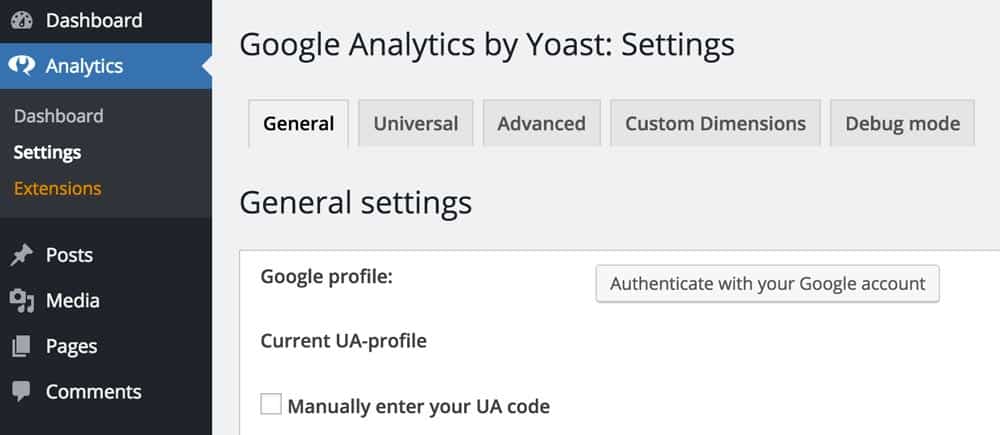
Go to the Settings panel in the Analytics tab on your website. You have two options for connecting your account: authenticating your account with Google or manually entering your UA code. I recommend authenticating your account with Google. This option provides great Analytics dashboards inside your website.
6 Steps to authenticate with Google Analytics
- Click “Authenticate with your Google account”.
- A pop-up will come up. Use this to sign in to your Google account.
- Accept the plugin’s terms so it can access your Google Analytics data.
- Copy the code Google gives you.
- Paste the code into the prompt from the plugin.
- Select your Google Analytics profile from the drop-down menu.
Prefer to manually enter your code?
If you manually enter your code, you don’t get the dashboards. You’ll still be connected to Google Analytics, but you’ll have to go to the Analytics website to view any data. You need your UA number to manually connect. It’ll look something like this: UA-72843503-1. Find it in the Tracking Code section of your Analytics admin panel.
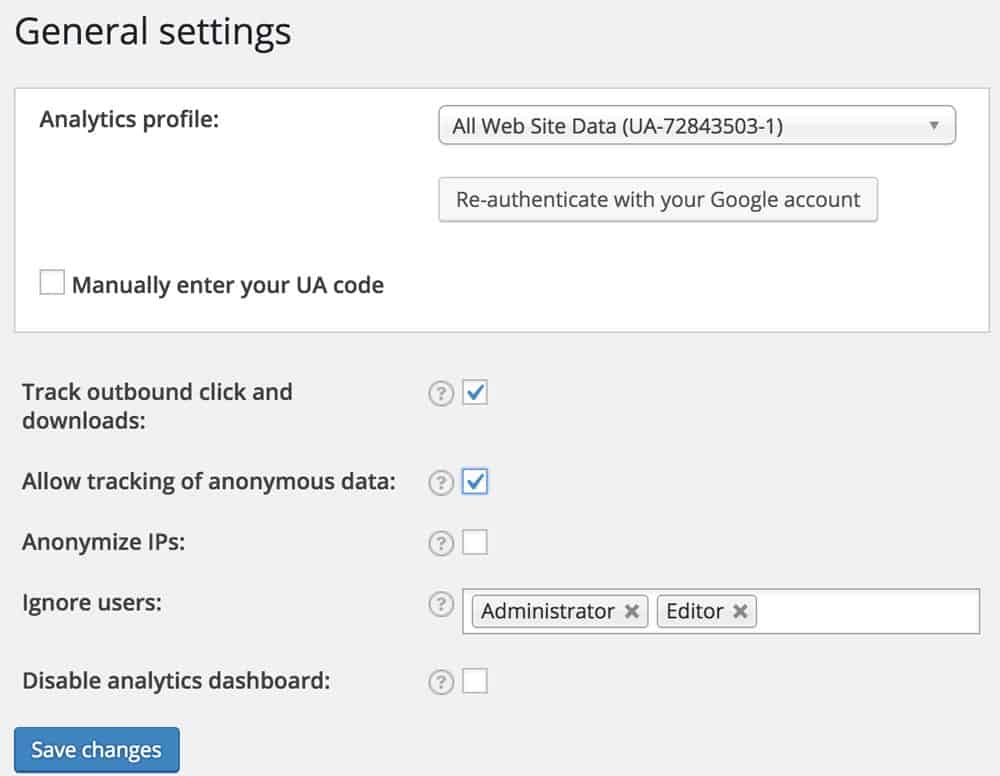
3) Configure Google Analytics by MonsterInsights’ general settings
 Tick off the “Track outbound click and downloads” option.
- Tick off the “Allow tracking of anonymous data” option. This shares anonymous data with the plugin developers so they can continue to improve it.
- Ignore user roles on your website. This setting depends on how your website is set up. You’ll most likely want to ignore administrators and editors.
- Save your settings!
 Tick off the “Track outbound click and downloads” option.
4) Configure Google Analytics by MonsterInsights’ universal settings
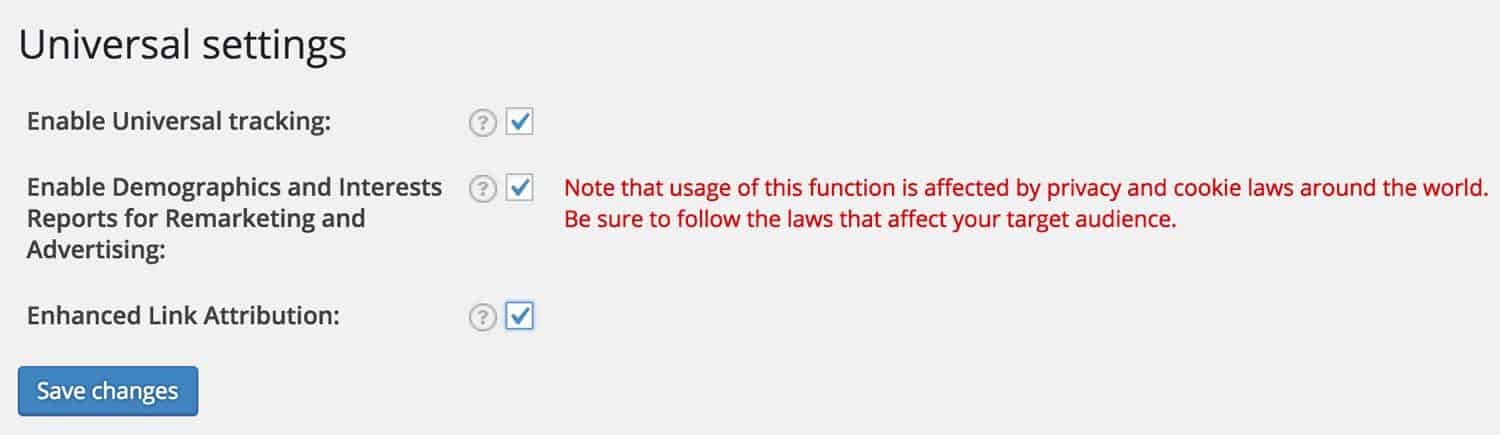
- Tick off the Enable Universal Tracking option.
- Tick off the Enable Demographic and Interest Reports option.
- Tick off the Enhanced Link Attribution option.
5) Configure Google Analytics by MonsterInsight’s advanced settings
Some settings in the advanced panel are particular to your website and how it’s set up. I don’t use all of the options. Follow the instructions below to enable the options I recommend. Leave the other options blank.
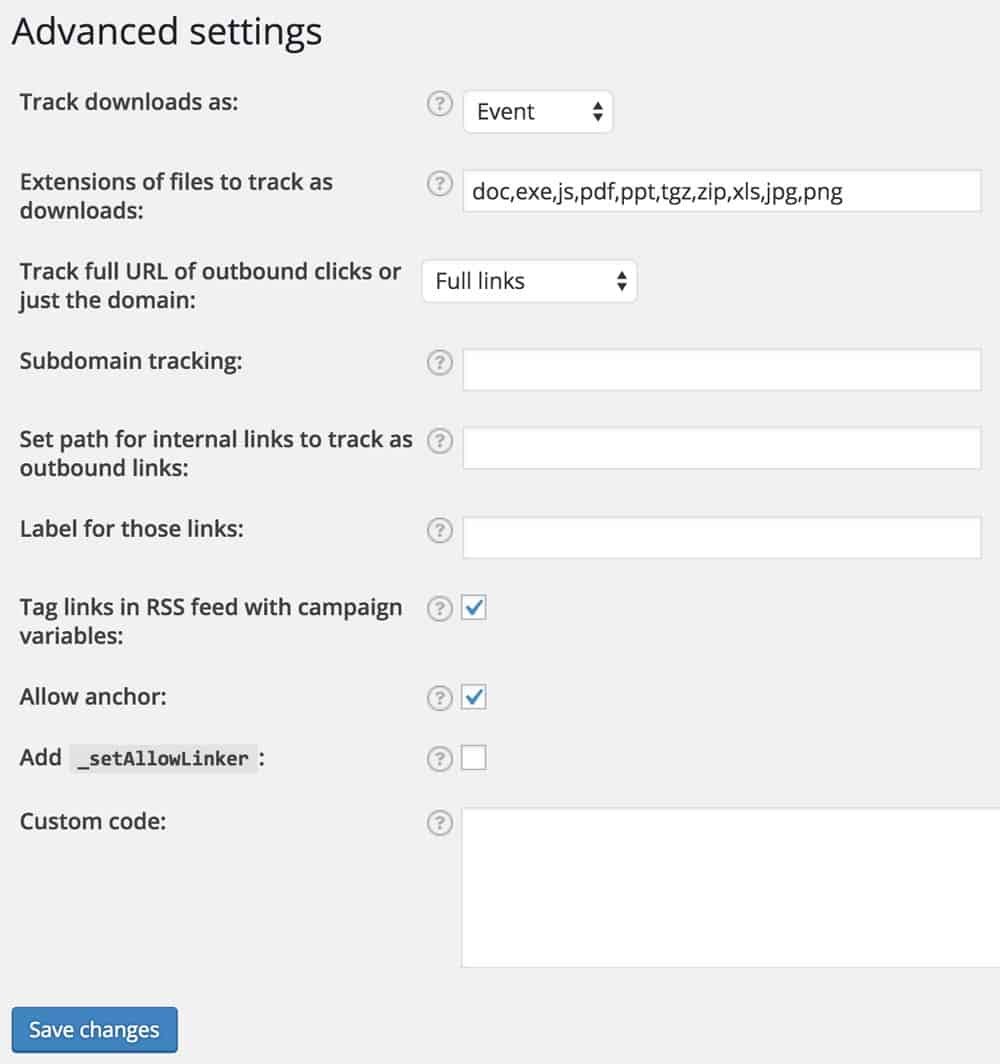
- Tell the plugin to track downloads as events. Now all downloads will appear under the Behaviour > Events panel in your Analytics account.
- Review the file types listed under the “extensions of files to track” option. By default, it doesn’t include image files like JPGs or PNGs. If you want to track image downloads, add those to the list!
- Select “full links” for the “track full URL of outbound clicks” option. This displays more information on outbound links in your analytics data.
- Tick off the “tag links in RSS feed with campaign variables” option. This adds data to links in your RSS feed.
- Tick off the “Allow anchor” option.
Whew! That’s it. Google Analytics is set up on your website. You should now have two new plugins installed on your website: Google Analytics by MonsterInsights and GM Block Bots.
Hungry for more analytics knowledge?
If you’re in Toronto, Ottawa, or Vancouver check out Camp Tech‘s Google Analytics classes. Camp Tech offers practical and professional tech skills training in a fun and friendly environment.
Check out Moz.com’s absolute beginner’s guide to google analytics or read Caitlin Bacher’s post on five ways to use google analytics to improve your website.
I hope you learned something new about Google Analytics. Have questions? Comment to fill me in.
What a useful tutorial! Great to know especially about the features that need to be turned on so the information gets captured. Will be sharing this quite a bit 🙂
Thank you, Nat! You’re right – there’s so many little things that have to be ticked off. You’ll miss out on the demographic and interest reports if you don’t tick the right buttons. 😉
This is so helpful! I already had Google Analytics set up, but I didn’t know about all these extra features. I’m going to block the hits from bots and spiders now (I’ve been seeing a lot of these lately and it’s throwing off my stats).
So glad this post was helpful for you, Sarah! Those bots are so annoying. I can’t event tell you how excited I was to find the GM Block Bots plugin. So lovely to have a hands-off method for blocking bots.
Great post, Melissa.
You’ve outlined the key elements of setting up Google Analytics so very well, thank you. A lot of websites struggle with “bot traffic” skewing their stats; and its not so obvious how to filter them out. You post makes this all so clear.
Thanks for a brilliant post, and for an elegant website. Bravo!
Thanks CJ! Oh man, those bots are so annoying. I love getting these steps set up on client websites right away. So much easier to deal with if you have it set up originally.
Once the bots are in your statistics, you need some more sophisticated filters to get rid of them.
Thanks for opting in to my newsletter too! You’ll get my next blog post straight to your inbox. 🙂
Hi Melissa, I am a writer and find that WP and associated apps, plug-ins and services take up a lot of valuable brain space when I’d rather be writing. Your posts are always clear and friendly and pitched at just the right level so that I feel clever for understanding and not (as) daunted. I am currently rewriting my 1970s (just kiddling) business site to align with the sites of my clients. I will be updating the theme and wanting to automate some onboarding and offerings so I am interested in those kinds of posts right now. Thanks again.
Thanks so much, Marian! So good to hear the posts are useful for you. This year, I set a goal of writing one post per month. I’m aiming for long detailed posts on beginner-friendly tech topics. Thanks for opting into my newsletter. You’ll get each new post straight to your inbox. 🙂
I hear you. Figuring out what apps and tools to use for your website takes a lot of time! I’m fascinated with all this stuff, but I understand it’s not everyone’s favourite thing.
It’s kind of like how I trust my accountant to figure out my taxes. I can’t be bothered to do that myself! I’d rather be developing websites or working with clients. For my clients, I’m the one figuring out things they’d rather not do. 😉
Hey Melissa,
I had no idea whatsover on how to use Google Analytics and am now very thankful for your short, direct but easy understandable description of how to install. I hope it works now! Thank you very much and greetings from Germany 🙂
Hello Melissa, thank you for a most helpful post! When usig monster analytics I see you have to configure analytics to enable demographics and interests reports etc, which you already done within google analytics itself already. Is this because monster analytics plugin inserts the code yo wordpress according to the settings within the plugin rather than what is set up in google? Also with the data shown within monster plugin, does it show what is set up in plugin rather than google? And does the settings in monster pluhin override what is set up in google? Thanks!
Hi Melissa,
This is a great and fantastic guide indeed.
Thanks!