How to use Zapier to automate your WordPress website
Connecting Zapier to your website opens a world of possibilities. You can automate social sharing, send project inquiries to a spreadsheet, connect your website to your project management software, and even connect MailChimp subscribers to Paypal. A strategically connected website is a game-changer for your business and Zapier is a powerful tool for creating those connections.
What’s Zapier anyway?
Zapier lets you easily connect the web apps you use, making it easy to automate tedious tasks.
– Zapier.com
Sounds pretty great, right? There are hundreds of ways you can harness Zapier’s power to automate your business. I love connecting a client’s WordPress website and Google Drive account to Zapier. Bam, without lifting a finger, Zapier will add all new inquiries into a spreadsheet. How useful would it be to have every client inquiry in one place? Planning an event? Zapier can save all the data into a spreadsheet for you.
You may have heard of IFTTT (if this, then that). Zapier is more powerful than IFTTT.
Zapier 101
Zapier terms defined
Zapier uses a few key terms. I’ll be using these terms throughout this post, and I want to make sure you know what I’m talking about.
- Zap – A zap is a connection you create using Zapier. A zap connects two services and performs an action. Connecting your WordPress website to your Google Drive account is one zap.
- Trigger app – Your trigger application is the first service in your zap. When something happens in your trigger application, it starts your zap.
- Action app – Your action app is the second service in your zap. When something happens in your trigger app, your zap connects to your action app to perform the zap.
- Task – A task is a single action performed by Zapier.
Plans and pricing
Prices vary according to how many zaps and tasks you use per month. The free plan includes five zaps and one hundred tasks per month. This is enough to automate a few things in your business. The $20/month plan includes twenty zaps and three thousand zaps per month. Paid plans also include premium applications like Shopify, Paypal, SalesForce, or Zendesk.
Examples of how to use Zapier
Zapier connects to over 500 applications so the possibilities of automation are a little mind-boggling. When I look at the possibilities, I want to automate everything. With so many possibilities, I can’t explain every use case in this post.
Everyone uses different tools. Look at the examples below and imagine how to apply them to your business. Maybe you use a different contact form plugin than I do, or prefer Hootsuite over Buffer. With over 500 connected applications, chances are your preferred service is available too!
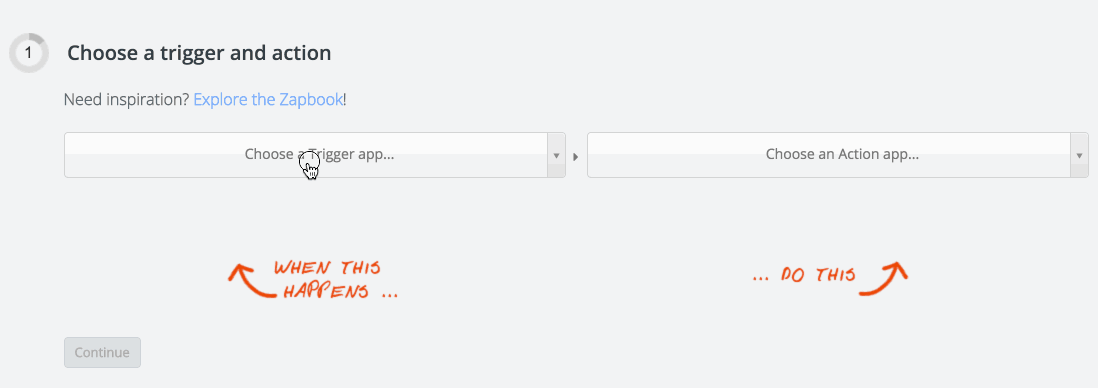
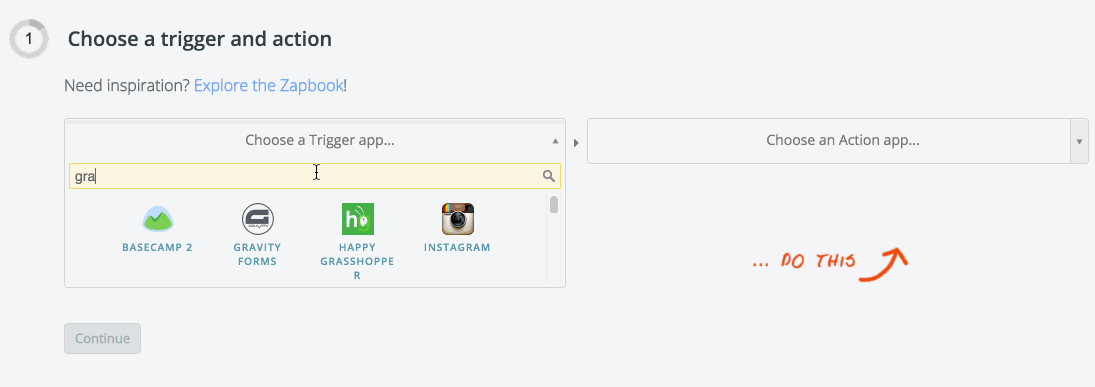
Creating a zap
Sign into your Zapier account and click “make a new zap.” The first step in creating a zap is selecting your trigger and action apps.
Example zap #1: send new WordPress content to Buffer
I use Buffer for social media sharing and scheduling. It connects to Twitter, Facebook (personal profile and pages), LinkedIn, Google Plus, and Pinterest. When I have a new post or useful resource to share, I add it to my Buffer queue. It shares content according to my schedule and provides analytics on shares, likes, and comments. Haven’t heard of Buffer? Learn about it in Val Geisler’s article on managing your social media in 15 minutes each week.
In this example, WordPress is the trigger app and Buffer is the action app. Zapier watches for changes on your WordPress website. When you publish a new post, Zapier adds it to your Buffer queue. If you don’t use Buffer, you could use Twitter, LinkedIn, or Facebook as the action app.
Five steps to send new WordPress posts to Buffer
Step 1: Select your trigger and action apps
Set WordPress as your trigger app. Then, select the zap trigger: do you want this zap to happen whenever there is a new post or a new comment? Set Buffer as your trigger app. Then, select your action: do you want the WordPress post added to your queue, or a specific schedule?
Step 2: Select your WordPress account
First time connecting Zapier to your website? It’ll prompt you for your website’s login information.
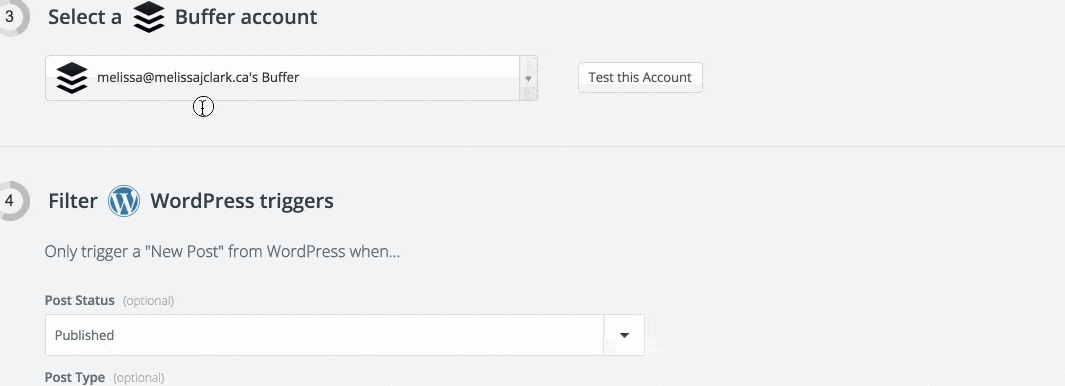
Step 3: Select your Buffer account
First time connecting Zapier to Buffer? It’ll prompt you for your Buffer login information.
Step 4: Tell Zapier what type of content to use for this zap
Set the published status (ie. private, draft, or published). I only use Zapier with published content, but the option is there if you need to work with private posts or drafts.
Select the “post type.” WordPress refers to your pages and posts as “post types.” I like to call these “content types” instead. Every WordPress website has pages and posts. Some WordPress websites have more content types for projects, testimonials or products. My website has a portfolio content type. I have one zap for sharing posts and another zap for sharing new portfolio items.
In this step, you can also set up custom filters. A filter is like a rule for the zap. For example, you could set up a filter so the zap only runs if the post has a featured image.
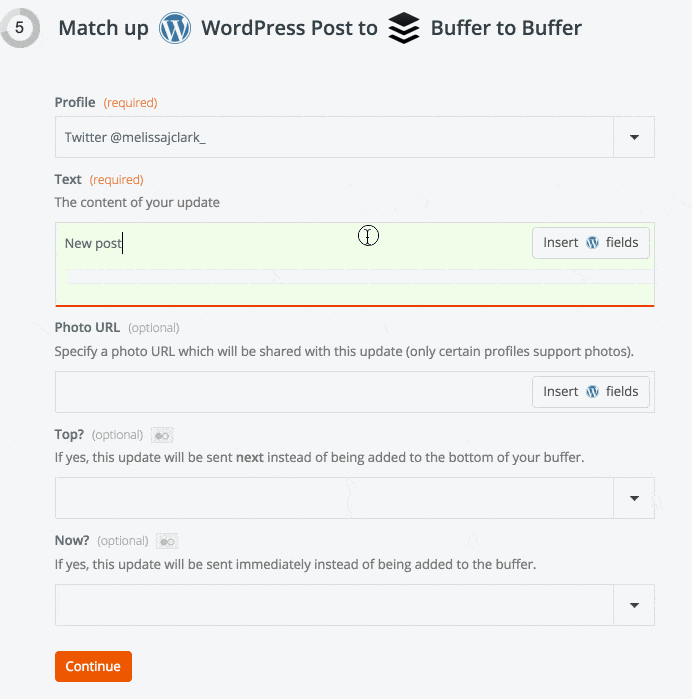
Step 5: Set up the content for your Buffer queue
First, select a social profile to use for this zap.
Next, use the text field to set up the content in your social media post. Type a message and click “insert WordPress fields” to grab data from your website. You can select website data such as the post’s title, date, category, excerpt, or link. I recommend inserting the post title and link.
Tweets with images get 150% more retweets so make sure to set the Photo URL for your social media post. Most WordPress websites use the “featured image” option to set a particular image for a post or page. Tell Buffer to share the featured image by choosing “post thumbnail link” as the image source.
Zapier will prompt you to name your zap, and turn it on. Once it’s turned on, you’re done!
That’s it! Now, Zapier will send new blog posts to Buffer
Next time you publish a new blog post, Zapier will take care of crafting the social media updates for you. I have this zap setup to send my new blog posts to Twitter, LinkedIn, and Facebook. I love that I can focus on writing my post and have Zapier take care of the rest.
Example zap #2: Send Gravity Forms data to a Google spreadsheet
Oh man, this is my favourite zap. It’s simple but so useful. I use it on my website. When a prospective client fills out my contact form, all the information is sent to a spreadsheet. At the end of each year, I review the data in my spreadsheet. This makes it easy to see which months are busiest, where my clients come from, and more.
What you need for this zap
- Contact form: I use Gravity forms. It has three pricing levels: personal, business, and developer. A developer license is $199 USD/year and you need it to connect to Zapier.
- Google Drive: online back-up service, comes with 15 GB of free storage.
I used to have the personal Gravity Forms license, and shelled out the extra money so I could connect to Zapier. That’s how much I love it!
I understand if you don’t have $199 USD to pay for a WordPress plugin. The instructions for creating your zap will refer to Gravity Forms. If you use a different contact form, the steps will be similar but not exactly the same.
Alternatives to Gravity Forms (these all integrate with Zapier)
- Formidable is a premium WordPress plugin. To connect to Zapier you’ll need the small business license which is $197 USD/year. Formidable also has a free version; it’s great but does not connect to Zapier.
- Ninja Forms is a free WordPress plugin. To connect your Ninja Forms contact form to Zapier, you can buy the Zapier add-on for $49 USD/year.
- Typeform is a free online service for creating forms. If you’re already using this, you’re in luck! You can hook it up to Zapier for free.
Six steps to send contact form inquiries to a google spreadsheet
Step 0: prepare your spreadsheet and review your contact form
Create a Google spreadsheet to send the data from your contact form. In Google Drive, click the “New” button and set the document type to “Google Sheets.”
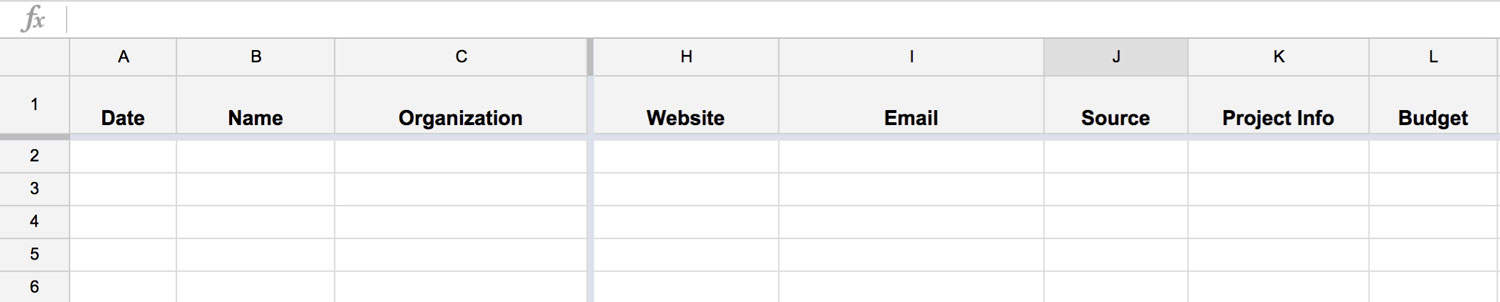
Take a look at your contact form. What fields do you have on your contact form? Create a column in your spreadsheet for each field in your contact form.
This is a great opportunity to review the questions on your contact form. Are you asking prospective clients the right questions? Could you add anything to your contact form to make client communication easier? My contact form asks a lot of questions. Those questions are valuable for determining if the client is a good fit for me, and understanding their project.
If you are using Gravity Forms, install the Zapier add-on. Go to the “Add-ons” panel of your Gravity Forms settings. The add-ons are listed alphabetically. Scroll to the end to find Zapier and install it.
Step 1: Set your trigger and action app
Click “create a new zap” in your dashboard. Set Gravity Forms as your trigger app and Google Sheets as your action app.
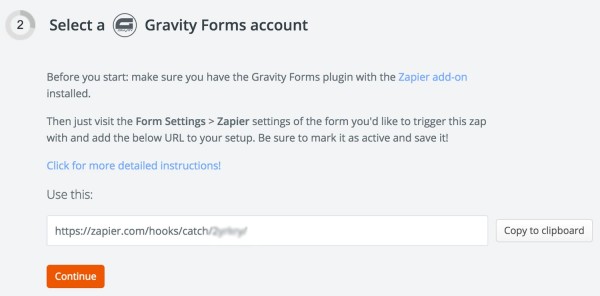
Step 2: Add the Zapier key to your WordPress website
To connect your contact form and spreadsheet, you need to add a URL from Zapier to your website. Copy the unique URL that Zapier gives you, you’ll need it in a moment!
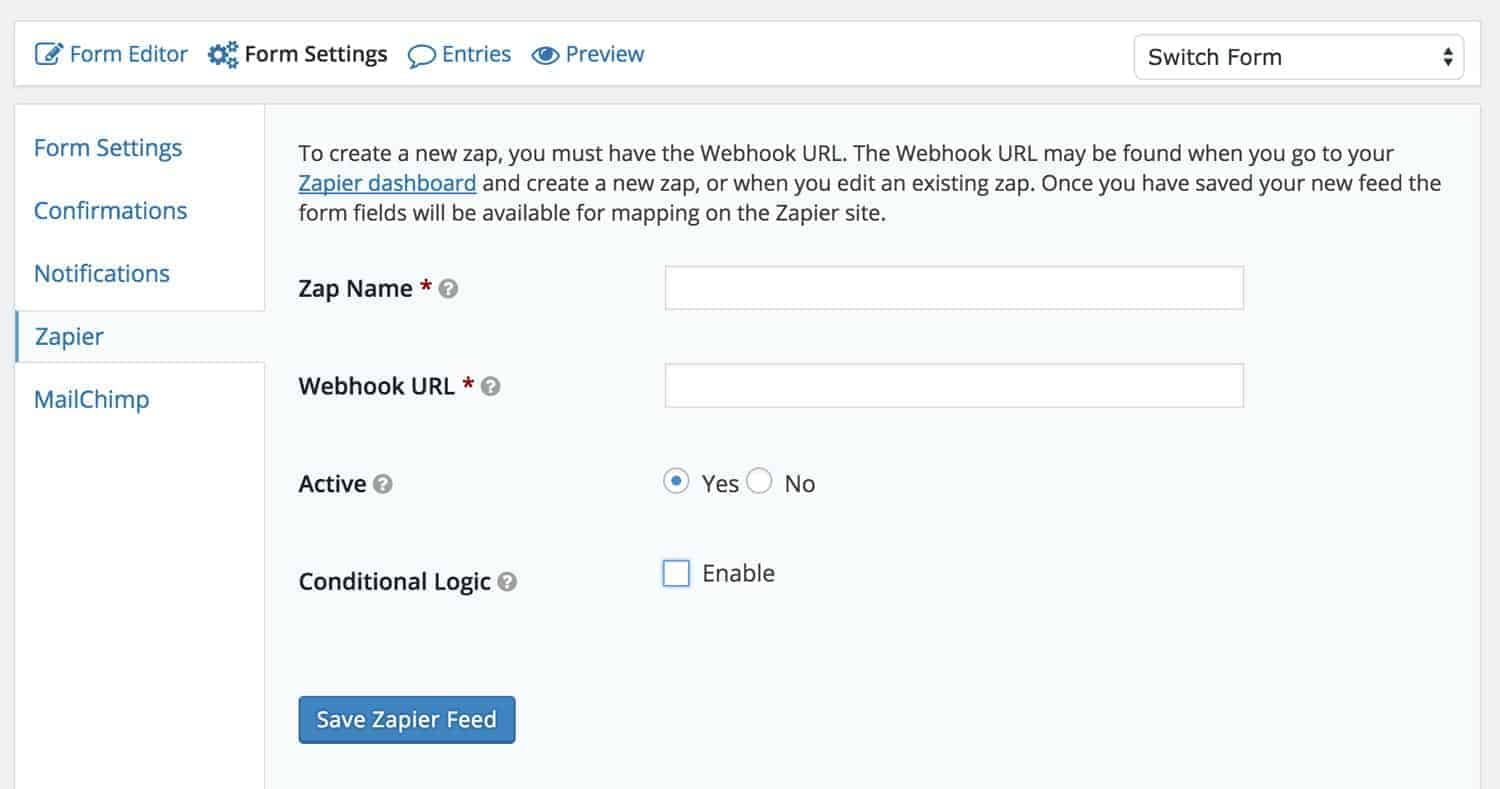
In your WordPress website, go to the gravity form you want to use. Click “settings” and navigate to the Zapier settings panel. Click “Add New” to start connecting Zapier to your website. Don’t see this panel? Make sure you installed and activated the Zapier add-on plugin for Gravity Forms. You can find it under the Gravity Forms add-ons panel.

Give the zap a name. This is just for you, you can name it whatever you like. Paste the webhook URL, and select “yes” for the active status. The conditional logic offers more control over when this zap runs. If you only want it to send certain information, enable conditional logic to set that up.
Step 3: Connect your Google Sheets account
If you’ve already connected a Google account to Zapier, you can select it now. Otherwise, follow Zapier’s prompts to connect your account.
Step 4: Filter your Gravity Form triggers (optional)
Just like we set up for the WordPress to Buffer zap, you can filter when you want the zap to run. I don’t use any filters on my Gravity Forms to google spreadsheet zap. Follow the instructions on custom filters if you want to set them up.
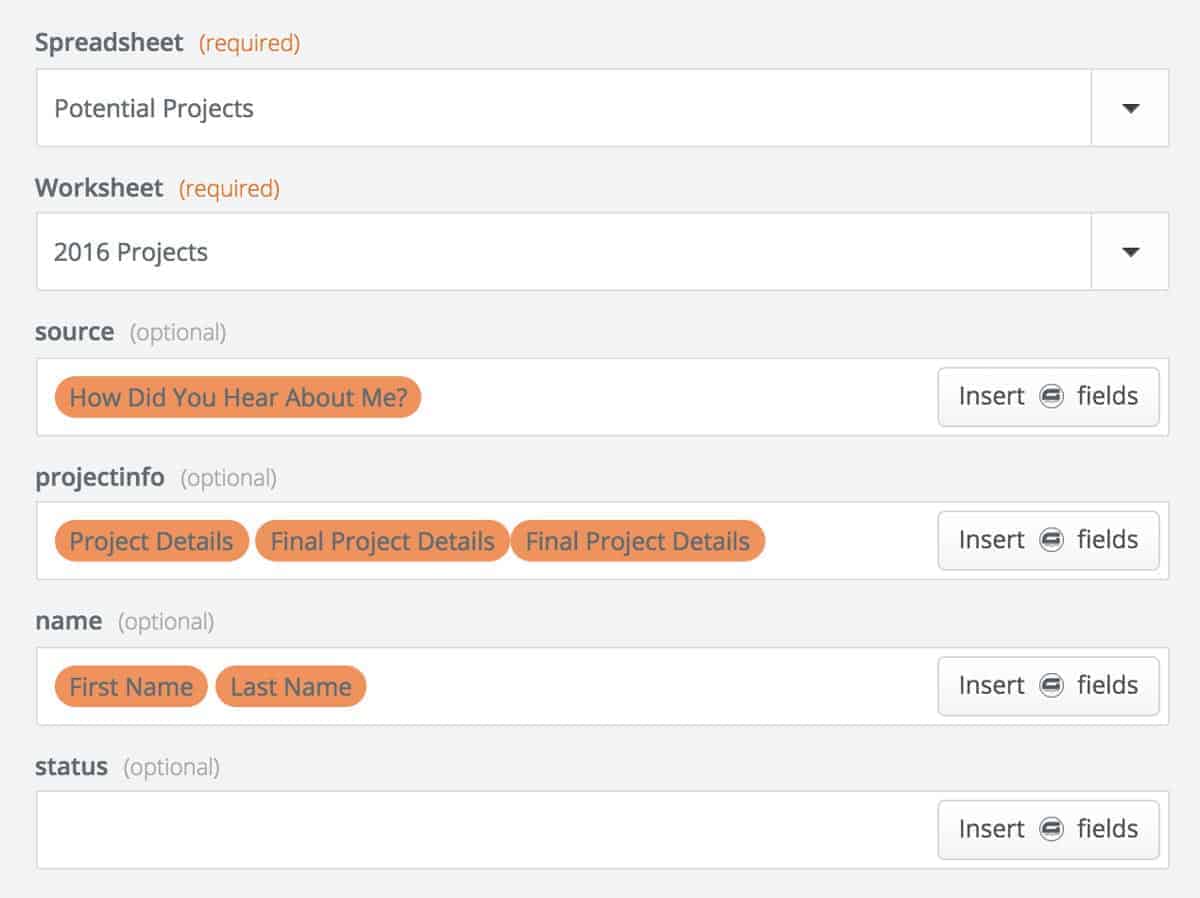
Step 5: Select your Google spreadsheet and worksheet
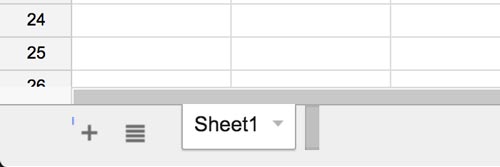
Follow Zapier’s prompts to connect your spreadsheet. Every spreadsheet has worksheets. These are like sub-pages inside the spreadsheet. The default name for your worksheet is “Sheet1.” Click the worksheet’s name to rename it.
Step 6: Connect your gravity form’s fields to your spreadsheet columns
Almost done! The final step is telling Zapier which form field data goes into which spreadsheet column. Use the “insert fields” menu to select data from your form, and input it into a spreadsheet column.
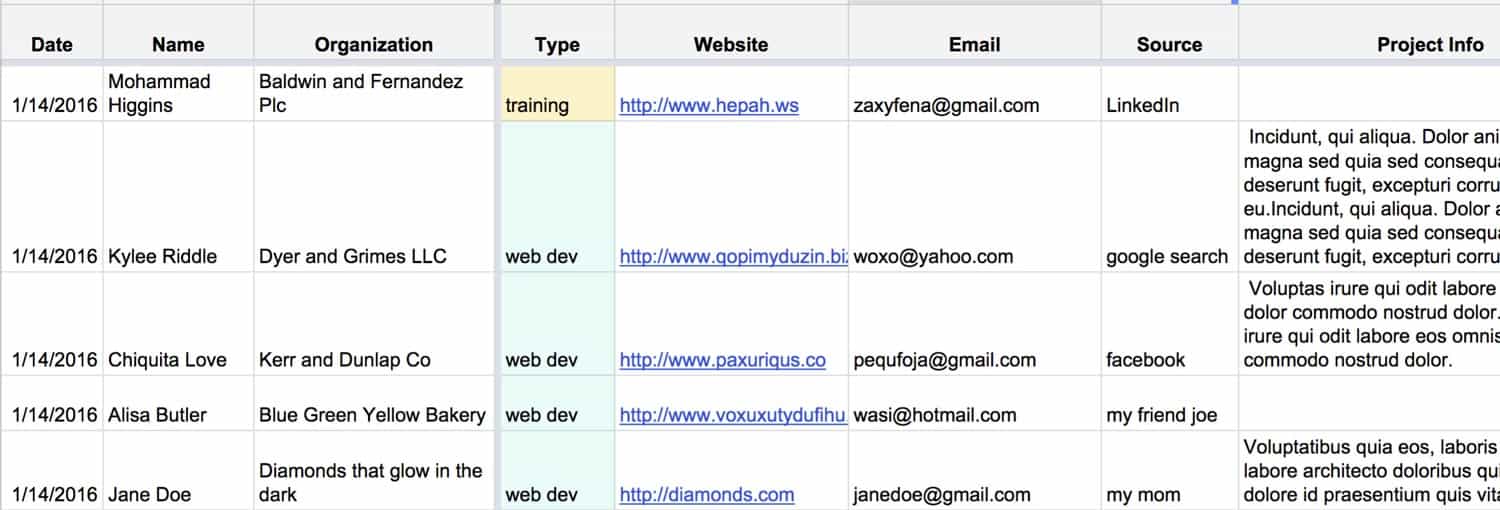
The final result: contact form data in the spreadsheet
I love this spreadsheet. In the creative class program, Paul Jarvis recommends using spreadsheets to track potential clients. Zapier enters all the information for me. My conditional formatting settings colour-code different types of inquiries. Later on, I use the spreadsheet to add notes on the project status.
This spreadsheet is an invaluable tool in my business. Sometimes I receive inquiries directly via email, Facebook, or LinkedIn. When that happens, I manually copy the information over to my spreadsheet. This way, all the information is one place.
Recommended zaps to automate your business
I shared my favourite zaps with you. If you’re anything like me, you’re thinking … what else can I automate? There are so many opportunities for automation!
- Use Slack to communicate with your team? You can post a new message to Slack when a Google Sheets row is updated. Combine this with the contact form inquiries to spreadsheet zap for ultimate automation.
- Want to add Gravity Form leads to your MailChimp list? Connect your accounts to Zapier and start saving Gravity Forms leads to MailChimp.
- Connect your accounting software and CRM (customer relationship manager). You can add new FreshBooks clients to Insightly as new contacts. Zaps are also available for Wave Accounting, SaleseForce, Highrise, Streak, Contactually and more.
Was this useful for you? I’d love to hear how you use Zapier in the comments. Fill me in if you have another great automation tool.
Pingback: Ten tools I use to run my freelance business (and what they cost)
Hi, excellent post!
I have an issue and maybe you can help me.
I have Gravity Forms integrated with Zapier and Benchmark for adding contacts in my benchamark’s list, and I need to change the unsuscribe email page. Do you know where I find this page?
Thanks a lot!
Hi Ivan, thanks for your comment! I’ve never used Benchmark, so I can’t really help you. Maybe ask Zapier for assistance?
We are just looking into Zapier and will have to upgrade our Gravity Forms to use Zapier, but your article is convincing me we need to do this! We have multiple forms in Gravity Forms, do you know if you can set it up through zapier so they will each have their own Google sheet? Or do all Forms go to one sheet only?